How to Clean and Install a Used CPU: Step-by-Step Build Guide
Advertisement
Buying second-hand hardware is the ultimate shortcut to a high-performance gaming PC or workstation on a budget. Among all PC components, the processor is one of the safest to purchase pre-owned: it has no moving parts, rarely degrades under normal operation, and generally either works perfectly or fails instantly. However, knowing how to install second hand cpu units correctly is critical. A single bent socket pin, a drop of grease on a contact pad, or an unevenly mounted cooler can turn your £150 upgrade into a costly paperweight.
In this guide, we walk through the entire process: cleaning off years of baked-on thermal compound, microscopically inspecting LGA pads and PGA pins, executing socket-specific installations for Intel LGA 1700/1851 and AMD AM4/AM5, applying the correct thermal paste pattern, and diagnosing your first boot. If you are still in the process of sourcing your hardware, make sure to read our comprehensive guide on buying a used CPU online in the UK to ensure you get a fair deal.
Safety First: ESD, Socket Fragility, and Preparation
Modern CPU architectures are marvels of nanotechnology, but they are physically delicate. LGA (Land Grid Array) motherboard sockets contain hundreds of tiny copper pins angled like springs. Dropping a CPU or touching these pins with your finger will bend them, often irreparably. Similarly, Electrostatic Discharge (ESD) can destroy the sensitive logic gates inside the silicon before you ever turn it on.
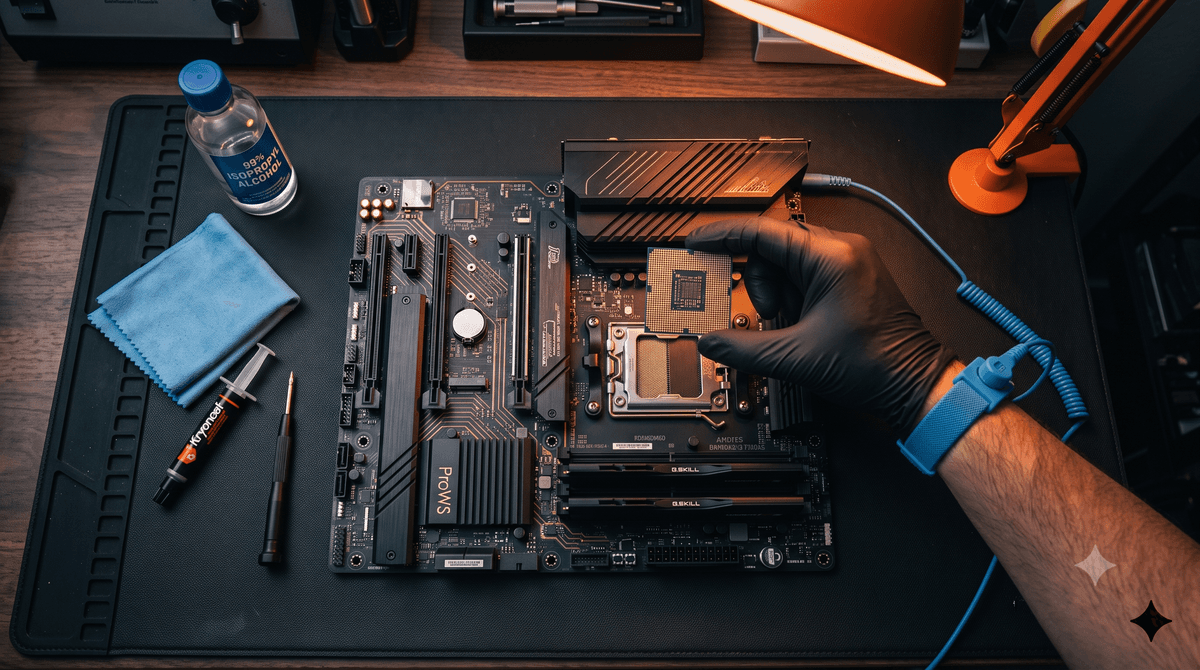
Set up a clean, well-lit workspace on a hard surface (avoid carpets). We highly recommend wearing an anti-static wrist strap connected to a grounded metal object (such as the metal chassis of an unplugged power supply plugged into a switched-off wall outlet). If you do not have one, ground yourself frequently by touching bare metal before handling components.
The UK Builder's Pre-Install Kit
You do not need industrial lab gear to clean and install a pre-owned CPU, but you must avoid cheap household substitutes like nail polish remover (which contains oils and scents) or kitchen roll (which leaves static-inducing lint). Sourcing these items in the UK is straightforward and inexpensive:
99% Isopropyl Alcohol (IPA)
Available for £5–£7 for a 500ml bottle from Amazon UK, local trade merchants (Screwfix, Toolstation), or electronic component shops. Do not use rubbing alcohol that is below 90% concentration.
Lint-Free Microfibre Wipes
Do not use standard tissues or kitchen towels. Medical wipes, lens cleaning cloths, or dedicated electronics microfibre wipes (around £3–£5) are designed not to shed fibres onto pads.
Premium Thermal Compound
Don't reuse dried paste. Pick up a fresh tube of Arctic MX-6 (£7–£9), Noctua NT-H2 (£9–£11), or Thermal Grizzly Kryonaut (£11–£14) from UK retail sites or Amazon. A standard 2g–4g tube is enough for 5+ mounts.
Magnifying Glass / Zoom Camera
Essential for inspecting LGA socket pins and PGA processor pins. A smartphone camera set to 3x or 5x optical zoom under a bright desk lamp is a perfect diagnostic tool.
Step 1: Cleaning the Second-Hand CPU Safely
Pre-owned CPUs often arrive with dried, crusty grey thermal paste smeared across their Integrated Heat Spreader (IHS). If the previous owner was careless, paste might even be stuck on the edges of the green PCB or, worse, on the delicate contacts underneath. We need to restore the processor to pristine metal condition.
Cleaning the Integrated Heat Spreader (IHS)
- Place the CPU flat on a clean, anti-static surface. A rubberised anti-static mat is best, but a wooden desk or the clean cardboard box of your motherboard works in a pinch.
- Apply a few drops of 99% IPA directly to your lint-free wipe. Do not soak the cloth; it should be damp, not dripping.
- Gently wipe the top surface of the CPU's metal cap (the IHS). Work from the centre outwards to avoid spreading dissolved paste over the edges of the PCB.
- Repeat with clean sections of the wipe until the metal surface is completely clean and shiny, showing the original laser-etched model details (e.g. "Ryzen 7 7800X3D" or "Core i5-13600K").
- For hardened thermal paste stuck in the gaps or corners of AMD's AM5 "octopus-style" heat spreader, dip a wooden toothpick in IPA and scrape the grooves with light pressure, then wipe with the microfibre cloth.
Cleaning Contacts and Pins
How you proceed depends entirely on the layout of your processor:
LGA Pads (Intel LGA & AMD AM5)
The bottom of the CPU features hundreds of flat gold pads. If there is grease, skin oil, or thermal paste residue on these pads, it will block electric signals, causing boot loops or memory detection errors.
- Dampen a microfibre wipe with 99% IPA.
- Wipe the gold pads flatly, gently, and in a single direction. Never scrub.
- Inspect under light to ensure no micro-fibres or grease films remain.
- Wait 5 minutes for the alcohol to completely evaporate.
PGA Pins (AMD AM4)
Older AMD processors have gold pins sticking directly out of the CPU. These are highly susceptible to bending. If thermal paste is stuck between the pins, do not wipe it with a cloth. Wiping will bend the pins and shred the cloth.
- Dip an ultra-soft, anti-static ESD brush or a clean, soft-bristled toothbrush in 99% IPA.
- Gently flick the bristles between the pins to clean out paste residue.
- Let the processor dry completely. Do not blow on it with your breath (moisture content).
Step 2: Inspecting the Motherboard Socket & CPU Pins
Before physical installation, you must conduct a rigorous visual inspection. A pre-owned processor may have suffered shipping damage, or the motherboard you are using (especially if bought second-hand) might have pre-existing socket damage.
Motherboard Socket Inspection (LGA Platforms)
Hold your motherboard under a strong, direct desk lamp. Tilt the board at various angles to look for inconsistencies in the light reflections off the socket pins.
- Light Pattern test: Every pin in the socket grid should reflect light uniformly. If you see a dark spot, or a bright spot reflecting at a different angle, zoom in on that area using your smartphone camera.
- Debris check: Look for tiny specks of dust, fluff, or old thermal paste dropped into the socket. Never use a toothpick or tweezers to fish debris out of an LGA socket. Instead, use a can of compressed air held upright (never tilted, to avoid spraying liquid propellant) and blow in short, gentle bursts from a distance.
CPU Pin Inspection (PGA - AMD AM4)
Hold the CPU at eye level and look along the rows of gold pins horizontally and vertically, like checking the grid of a vineyard.
What to do if you discover bent pins
If an AMD AM4 processor has 1–3 slightly out-of-alignment pins, you can sometimes carefully correct them:
- Take a mechanical pencil with a 0.5mm lead sleeve. Retract the lead completely.
- Carefully slide the empty metal sleeve over the bent pin.
- Use microscopic, gentle pressure to budge the pin back into alignment with the rest of the row.
- Alternatively, slide a thin credit card or plastic bank card down the rows. If the card catches, a pin in that row is bent. Use the card's edge to gently leverage the pin back into line.
Warning: Gold-plated copper pins work-harden and snap easily if bent back and forth. If a pin is bent severely (more than 45 degrees) or already broken, do not attempt to fix it. Return it to the seller or seek professional repair.
If you need to check how to clean other used components before placing them in your system, our complete guide on how to clean used PC parts covers graphics cards, RAM, motherboards, and PC cases in detail.
Step 3: Socket-Specific Installation Guides
AMD and Intel use different mechanisms to clamp the CPU. Follow the instructions for your specific socket type:
AMDAMD AM4 Platform (Ryzen 1000–5000 Series)
AM4 is a PGA socket. The motherboard features a plastic grid with tiny holes and a metal tension arm.
- Pull the metal tension lever on the socket slightly outwards, then lift it fully up to a 90-degree vertical angle. You will feel the internal plastic slide slightly to align the socket holes.
- Locate the small gold triangle in one of the corners of the Ryzen CPU.
- Locate the matching embossed triangle on the motherboard socket (also printed on the motherboard PCB).
- Hold the CPU by the edges and align the two triangles.
- Gently lower the CPU vertically into the socket. **Do not apply any downward pressure.** If aligned correctly, the CPU pins will slide into the socket holes, and the CPU will seat perfectly flat under its own weight.
- If the CPU does not drop in, check for bent pins. Never push the chip down; forcing it will bend or snap the pins.
- Hold the CPU down very lightly with one finger, and push the metal tension lever back down until it snaps under the retention tab. You will feel minor mechanical resistance; this is normal as the socket locks the pins.
AMDAMD AM5 Platform (Ryzen 7000 Series & Newer)
AM5 is an LGA socket. The motherboard has a metal frame (the Retention Frame) and a black protective plastic cover resting over the socket pins.
- Push the metal lever down and outward to release it from the hook, then lift the lever. This opens the metal retention bracket (load plate).
- Leave the plastic protective cover in place on the load plate. Do not pop it off manually.
- Look for the alignment notches on the sides of the CPU PCB and the matching notches on the inner socket walls. Also align the gold triangle on the corner of the CPU with the triangle indicator on the socket.
- Hold the CPU by its edges and lower it straight down into the socket. The alignment tabs on the socket must sit snug within the CPU's notches. The CPU should sit perfectly flat, without rocking.
- Gently close the metal bracket (load plate) over the CPU. The notch at the front of the plate should sit under the round metal collar screw.
- Push the tension lever back down. As you push the lever down, the black plastic protective cover will automatically pop out with a snap. Keep this cover in a safe place — you must reinstall it if you ever remove the CPU, or the motherboard's warranty will be void.
- Secure the lever under the plastic hook.
INTELIntel LGA 1700 / LGA 1851 (12th–15th Gen Core)
Intel's modern desktop platforms utilize an elongated rectangular LGA socket. The installation process is similar to AMD AM5, but uses a different notch configuration.
- Unlatch the socket lever by pressing down, pushing outward, and swinging it fully open. Lift the metal load plate.
- Keep the plastic protective cover clicked into the load plate.
- Align the two notch cutouts on the CPU PCB with the plastic alignment keys inside the socket. Look for the golden triangle on the corner of the CPU and align it with the corner indicator on the socket.
- Lower the CPU straight down into the socket. Confirm the CPU is perfectly level and cannot slide or wiggle.
- Lower the load plate. Press the tension lever down to the locked position. The plastic cover will pop off under pressure. Secure the lever under the metal retention tab.
Step 4: Thermal Paste Application Patterns
Thermal paste fills microscopic air gaps between the flat surface of the CPU's heat spreader and the base plate of your cooler. Air is a terrible conductor of heat; thermal paste is excellent. Applying the right amount and pattern is essential to prevent thermal throttling.
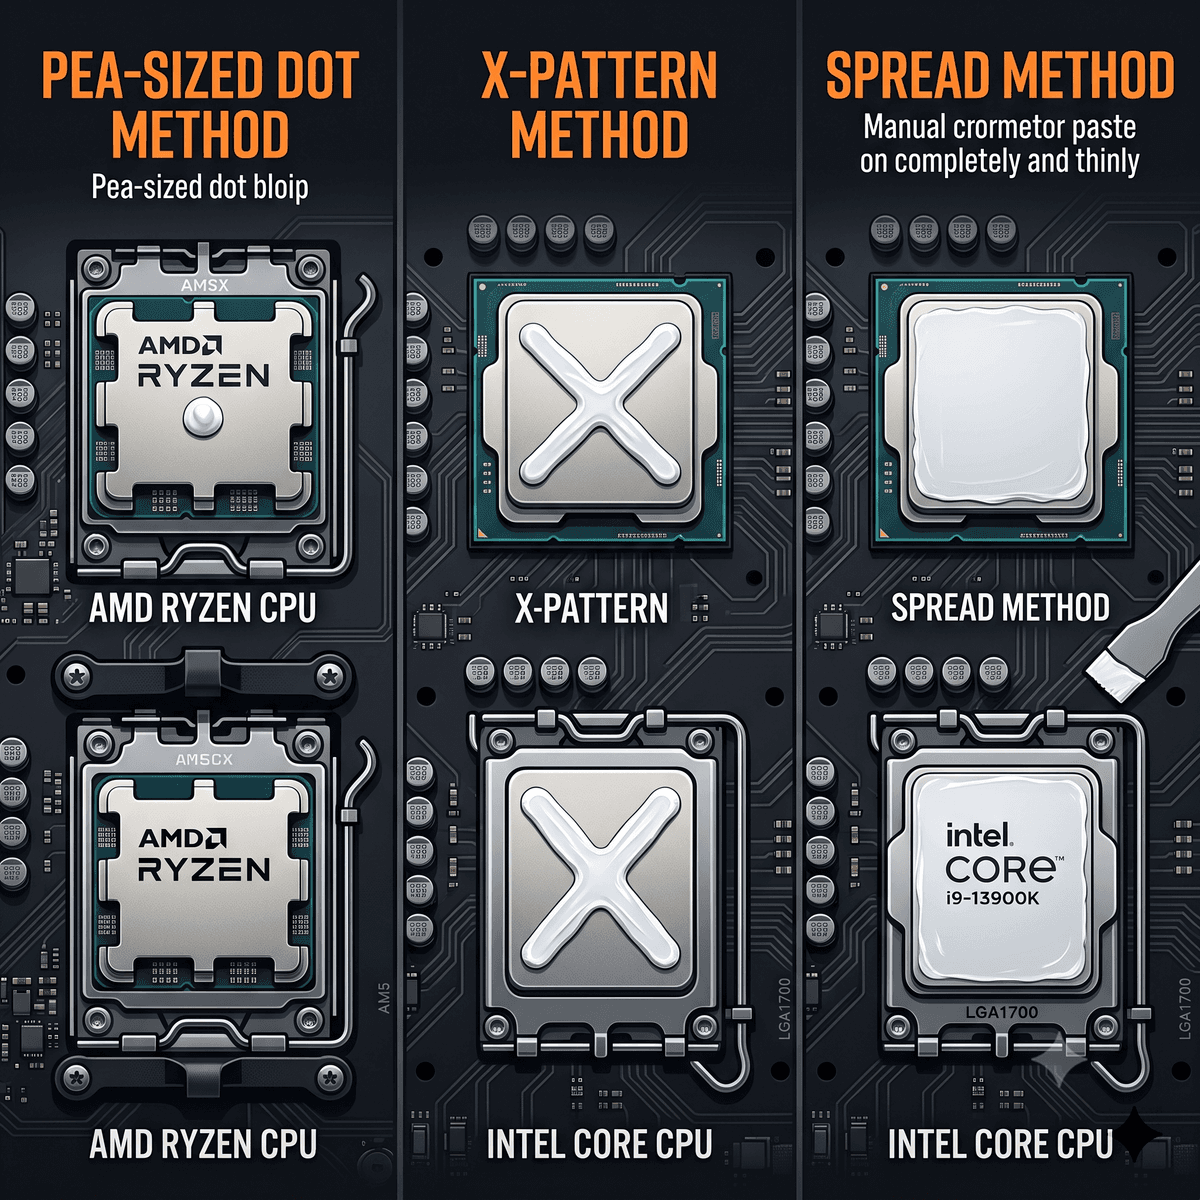
The three main application methods. All work well if the volume is correct.
There are three reliable methods to apply fresh thermal compound:
Squeeze a single blob of thermal paste, roughly 4mm–5mm in diameter (about the size of a green pea or a small UK five-pence piece), directly in the dead centre of the CPU IHS. The mounting pressure of the heatsink will automatically spread the paste radially outward in a circle. This is safe, easy, and minimizes air bubbles.
Draw two thin diagonal lines from corner to corner across the heat spreader to form an "X". Keep the lines thin and stop about 5mm short of the corners. This method is highly effective for rectangular CPUs (like LGA 1700) or CPUs with chiplets off-centre (like AMD Ryzen), ensuring complete coverage at the edges.
Apply a small dot of paste and use a clean plastic spatula, old bank card, or the spreader included with some premium compounds to spread a paper-thin, uniform layer across the entire IHS. This ensures 100% immediate coverage but requires patience to avoid leaving high spots or trapping air bubbles.
Step 5: Mounting the CPU Cooler
Whether you are using a basic stock cooler (like the AMD Wraith Stealth) or a large dual-tower air cooler (such as the Thermalright Peerless Assassin 120, which is extremely popular in the UK for around £30–£35), even mounting pressure is crucial.
- Peel the sticker: Check the bottom copper plate of your CPU cooler. Most new and some refurbished coolers ship with a clear plastic sticker reading "PEEL BEFORE INSTALLATION". Leaving this on is one of the most common pc building mistakes, resulting in idle temperatures shooting straight to 95°C and thermal shutdown.
- Align with the brackets: Secure the cooler's mounting brackets to your motherboard's backplate according to the manufacturer's manual. Ensure the bracket stands are firmly screwed down.
- Cross-tightening (X-Pattern): Lower the cooler heatsink onto the CPU. Tighten the securing screws gradually in a cross pattern. Screw in one corner by 2 turns, then the diagonally opposite corner by 2 turns, and repeat. This spreads the thermal paste evenly and prevents the CPU from tilting or receiving high pressure on one side, which can crack the silicon die or bend LGA pins.
- Connect the fan: Plug the CPU fan cable into the motherboard header labeled `CPU_FAN`. If you are using an AIO liquid cooler, connect the pump power cable to `AIO_PUMP` or `SYS_FAN_PUMP` to ensure the pump runs at 100% constant speed.
Step 6: First Boot and Diagnostic Testing Checklist
With the CPU and cooler installed, it is time for the moment of truth. Before you put the side panels back on the case, perform this initial testing sequence:
The First POST (Power-On Self-Test)
- Plug in your monitor to the graphics card (or the motherboard if your CPU has integrated graphics) and connect power.
- Turn on the system. If it is a new AM5 platform, the first boot can take up to 2–5 minutes while the system performs "Memory Training". Do not panic if you see a black screen initially and the fans spin at maximum.
- If your motherboard features debug LEDs (CPU, DRAM, VGA, BOOT), watch them. A solid red LED next to "CPU" indicates either a BIOS compatibility issue, an unseated power connector (ensure the 8-pin EPS cable is plugged into the top-left of the motherboard), or physical socket damage.
- To verify everything works correctly before finalizing the build, follow our full diagnostic workflow in how to test used PC parts.
BIOS Verification & Tweaks
Once you boot successfully into the BIOS:
- Check the hardware monitor page. Confirm that the CPU model is correctly detected, the RAM capacity is fully recognized, and the idle CPU temperature sits steadily between 30°C and 45°C.
- If temperatures are rising rapidly toward 80°C in the BIOS, turn off the PC immediately. Your cooler is either not seated flatly, or you forgot to plug in the fan/pump.
- Configure memory profiles: Enable XMP (Extreme Memory Profile) on Intel platforms or EXPO (Extended Profiles for Overclocking) on AMD platforms to set your RAM to its advertised speed.
Windows Stress Testing
After loading into Windows, run diagnostic software to verify stability:
- HWiNFO64: Keep this sensor monitoring software open in the background to log maximum temperatures and core clocks.
- Cinebench R23: Run a 10-minute multi-core loop. Watch the temperatures in HWiNFO64. Under load, modern CPUs will boost until they hit their thermal limit or power ceiling. Intel chips are designed to target 90°C–100°C under heavy AVX loads, and AMD AM5 chips will boost up to 95°C before throttling. As long as your clocks remain near the rated boost speed and the system doesn't crash or blue-screen, the mount is successful.
Buying Pre-Owned CPUs Safely in the UK
Installing a pre-owned CPU successfully starts with buying a healthy unit. Private sales on standard classified sites or local collection apps carry risks, particularly around postal disputes.
If you are buying via post, always insist on tracked services with adequate insurance cover (such as Royal Mail Special Delivery, which covers electronics value up to £750 and guarantees next-day delivery, or Evri with full value cover). Avoid untracked standard parcels. Under the UK Consumer Rights Act, if you buy from a registered business seller on a marketplace, you have a statutory 14-day right to return the item for any reason. If you purchase from a private seller, the goods must still be "as described", but you have far less leverage if you find out the chip is faulty after installation.
Frequently Asked Questions
Is it safe to wash a used CPU in water?
No. Never wash electronic components in water. Tape-adhered components, capacitors, or micro-transistors can trap mineral deposits from tap water, leading to corrosion and short-circuits. Isopropyl alcohol (90%+) is the only approved solvent because it evaporates rapidly and leaves zero conductive residue.
What should I do if my system boots, but fails to detect all my RAM?
This is a classic sign of uneven CPU cooler mounting pressure or a bent socket pin. If the cooler is tightened too hard on one side, it warps the CPU package slightly, breaking contact with the memory channel pins in the socket. Turn off the PC, loosen the cooler, and retighten it using the diagonal X-pattern with moderate pressure. If the issue persists, inspect the socket for bent pins.
Should I buy an Intel or AMD CPU if I'm shopping second-hand?
Both are great choices, but they have different cost profiles. AMD AM4 is currently the king of budget builds in the UK (with chips like the Ryzen 5 3600 or 5600 costing under £60 pre-owned). AM5 offers a solid path for future upgrades, while Intel LGA 1700 (12th–14th Gen) offers excellent value in the mid-range. Check out our used PC parts price guide for current market rates.
Can I use standard rubbing alcohol from a UK pharmacy?
Most rubbing alcohol sold in UK high-street pharmacies (like Boots or Superdrug) is surgical spirit, which is typically 70% ethanol or isopropyl alcohol mixed with water, castor oil, or fragrance. This is not suitable because the castor oil leaves a greasy film, and the high water content takes too long to dry. Buy pure 99% IPA online or at trade stores instead.
Can a CPU fail silently?
Very rarely. When a CPU fails, it usually manifests as a complete failure to POST (red debug LED on motherboard), instant blue screens under load, or failing specific mathematical checks in software like Prime95. Silent degradation is almost always caused by degradation of the motherboard's power delivery (VRM) or poor thermal contact.
Advertisement